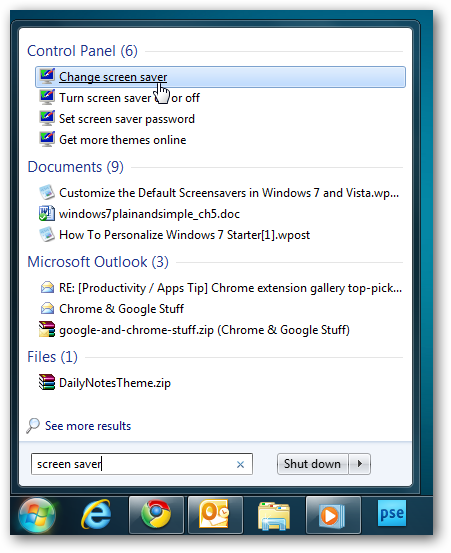
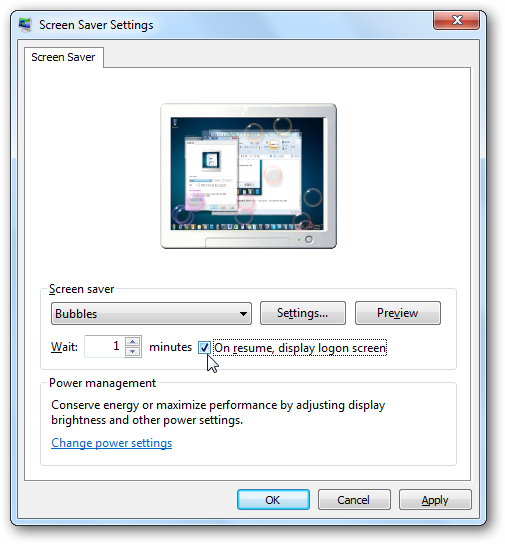
Friday, 24 September 2010

Use Your iPhone or iPod Touch to Remotely Control Your PC


via the How-To Geek by Mysticgeek on 9/23/10

Have you ever wanted an easy way to remotely control your PC? Here we take a look at using Touch Mouse from Logitech which works over Wi-Fi so you can control your PC from anywhere in your house.

Installation and Setup

Download Logitech Touch Mouse from the iTunes App Store through iTunes or directly from your iOS device.

sshot-2010-09-18-[00-22-17]

After that’s installed, you need to download and install the Touch Mouse Server on your PC or Mac (link below). It is available in 32 & 64-bit versions for XP, Vista, and Windows 7. There’s  a version for Mac OS X as well.

Installation of Touch Mouse Server is easy following the wizard and accepting the defaults. You will need to install the server software on each computer on your network that you want to remotely control.

sshot-2010-09-22-[22-37-52]

Then you will find Logitech Touch Mouse Server in All Programs in the Start Menu.

sshot-2010-09-22-[23-10-12]

The server icon lives in the system tray. Right-click on the icon to stop the server and close out, or check the server settings.

sshot-2010-09-22-[23-11-37]

You can find the IP of your computer and the IP of your iOS device. Also, uncheck Start this application automatically when Windows starts if you don’t want it to run during boot up.

sshot-2010-09-22-[23-43-00]

Using Touch Mouse

Now that the server is setup, launch the app and we can start using our iOS device as a remote control for our PC.

sshot-2010-09-22-[23-37-27]

Just click on the PC you want to control or enter in the IP address of the machine.

sshot-2010-09-23-[00-40-39]

Just move your finger around the black tracking area to move your mouse cursor, then you also have right, left and middle click.

sshot-2010-09-22-[23-38-36]

Pull up the Keyboard and you can type on your PC. You’ll see the text on your iOS device and also the computer.

sshot-2010-09-22-[23-39-17]

For example we opened up Notepad and began typing in it from our iPod Touch.

sshot-2010-09-22-[23-35-47]

You can type in any program that is installed on your PC. Here we’re typing in a search term in the Firefox Google bar. Here is what you’ll see on your iOS device…

sshot-2010-09-23-[00-44-32]

Then whatever you type is exactly what is displayed in whatever program you’re in.

sshot-2010-09-23-[00-34-32]

You can use it in Landscape mode too which makes typing more quickly easier.

sshot-2010-09-23-[00-45-24]

Go into Settings to change the way the way the remote works with your computer. You can change things like Tracking Speed, Clicking Options, Scrolling and more.

sshot-2010-09-22-[23-38-19]

If you want to disconnect, tap on the Disconnect icon.

sshot-2010-09-23-[00-54-14]

It only takes a few moments to disconnect the signal.

sshot-2010-09-23-[00-54-35]

It also includes a nice user guide in case you get stuck or aren’t sure how to control something.

sshot-2010-09-22-[23-40-15]

Touch Mouse from Logitech is a basic remote app for your Mac or PC. It doesn’t include advanced features of other commercial remote apps such as HippoRemote, but it’s free and does a decent job. This can really be handy if you have your PC connected to your HDTV or want to kick back at your desk and not have to sit up close with your keyboard and mouse. If you use Windows Media Center, it allows you to control it easily from the comfort of your couch.

Logitech Touch Mouse App for iPhone, iPod Touch, and iPad

Download Touch Mouse Server


Beginner: Automatically Lock Your Computer When You’re Away


via the How-To Geek by Matthew Guay on 9/22/10

Would you like your computer to automatically lock and require you to enter your password when you exit the screensaver?  Here’s how to quickly change your screensaver settings to keep your computer secure when you’re away.

To get started, right-click on your desktop, and click Personalize to open the personalization settings dialog.

Click Screen Saver under the themes to change your screensaver settings.

image

Alternately, if you’d rather open the screensaver settings without grabbing your mouse, hit the Win key and enter Screen Saver in the search box, and select Change screen saver.

image

This will open the Screen Saver settings dialog.  Select the screensaver you want, then check the box to display the login screen when you exit the screen saver.  Enter the number of minutes you want to wait before your screensaver starts, then click Ok to save your settings.

image

Now, after the length of time you selected, you’ll see your screensaver as normal.

image

Then, when you move the mouse or press a key, you’ll see the normal login screen instead of your desktop.  Enter your password and login as normal to access your computer.

image

Lock Your Computer Without a Screensaver

If you’re not fond of screensavers, you can lock your computer when you’re away without turning on the screensaver.  Just select None from the screensaver list, then check the box as before.  Now your computer will automatically switch to the Login screen whenever your computer is left for the amount of time you selected.

image

This trick only works if your coworkers and family doesn’t know your password, of course.  If you want to be sure that people can’t easily guess your password, check out our article on How to Automatically Lock Your Computer When Your Password is Entered Incorrectly.


Acronis Drive Monitor, Monitor Hard Drives For Critical Events


via gHacks Technology News by Martin on 9/24/10

Keeping an eye on the hard drives of a computer system ensures to receive notifications about imminent drive errors or other critical events that may affect the data on those devices. Modern hard drives usually support the SMART technology, which software can use to display information about a drive’s health.

Acronis Drive Monitor is a free hard disk monitoring software that uses SMART information and the Windows event log to display important events to the system user. The program is pretty basic, which is surprising considering its size of nearly 18 Megabytes.

On startup a summary is displayed, which displays disk problems, backup information and critical events. Disk problems are directly linked to SMART parameters, and the program will either report that all disks are working normally, or that problems have been encountered.

acronis drive monitor

acronis drive monitor

Critical events taps right into the Windows event log and displays high risk events of the system’s storage devices. Backup finally has probably been added to distribute or sell Acronis products as it proposes to download Acronis backup software if no backup software is detected on the system.

Links lead to detailed information about each of the information provided by the software. Probably the most interesting feature of the program is the critical events listing which makes use of the Windows Event log. Not many hard drive monitoring applications offer this feature.

Then again, it is possible to create those custom alerts quite easily without third party software.

The page displays all critical events, sorted by date. Included in the listing is the risk evaluation rating, severity, source and event id. A double-click on an event displays detailed information about that specific event, with a link to the Acronis Knowledge Base website for additional information.

critical events

critical events

The Disks page lists the usual information about the primary partition of the computer. We did not find an option to make the drive monitor display those information for other connected drives.

Finally, the program can create four types of alerts that are send to an email address that needs to be configured in the program’s options. Alerts can be configured for temperature levels, critical events, disks monitoring errors and backup monitoring errors.

Acronis Drive Monitor does not offer anything that other tools or even Windows first party tools do not offer. Some users may still be inclined to give the program a try, it is free after all. The program supports both 32-bit and 64-bit editions of the Windows operating system. Downloads are provided at the Acronis website after registration.


© Martin for gHacks Technology News, 2010.


McAfee URL Shortener

via gHacks Technology News by Martin on 9/24/10

It is not really clear to me why url shorteners have become that popular on today’s Internet. Sure, Twitter may have an impact on that, considering its 140 word limit per message, but there do not seem to be a lot of other applications for url shortening services.

Despite that, popularity has risen and more and more companies have created services to shorten long urls. The latest to join the ranks is security company McAfee which adds a twist to the game.

One of the biggest problems of nearly every url shortener is that the user does not know what’s behind the link. Some services offer intermediary pages to provide the user with the information, while most do not.

A click can lead to a legit site, or something else. Possibilities range from direct links to viruses and trojans, distasteful sites or other sites that try to attack or exploit.

The McAfee url shortener looks on first glance like any other service of its kind. The main page consists of a form and a shorten button.

mcafee url shortener

mcafee url shortener

Users enter or paste an url into the form and click on shorten to create a short version of the url. This is displayed on the next page. Several sharing options are displayed on that page including the popular choices Twitter, Facebook, Email and Google Buzz.

What makes the service interesting is that the destination will automatically be scanned for malicious contents. By default, a frame is displayed on top of the destination that indicates if a page has been deemed safe by McAfeee.

mcafee

mcafee

Creators of the shortened link can configure the service to bypass that frame if the site is clean. That’s optional on the other hand. Users who visited the site can close the frame as well.

The web page contents are not displayed if the website has been classified as malicious or otherwise dangerous by the service.

mcafee blocked site

mcafee blocked site

It is possible to still see the page that is blocked by the service, but that requires some manual work. There is no option to bypass by clicking a link. Instead, the link to the destination page is displayed needs to be copied manually and pasted into the address form of the browser.

The url shortening service has a few restrictions regarding the links that can be shortened:

  • No links to other url shortening services, including McAf.ee url shortening links
  • No links to private IP space
  • No links to badly formed domain names
  • No domain names with XSS, or tags

Users can access the McAfee url shortening service directly on the page. There is also a Google Chrome extension that can be used to create the shortened links.


© Martin for gHacks Technology News, 2010. | Permalink | Add to del.icio.us, digg, facebook, reddit, twitter
Post tags: , , , ,

Wednesday, 22 September 2010

How To Make Professional Video Editing Cuts Online For Free With JayCut


via MakeUseOf.com by Bakari Chavanu on 9/20/10

Jaycut.com may be the only web-based video editing application that registered members can use for free. Jaycut is not a professional video editor by a long shot. It doesn’t work as fast as consumer editors like iMovie and MovieMaker, but it can be very useful if you don’t have these applications or if you just need edit online.

Jaycut may have limitations but it doesn’t mean you can‘t use professional video editing techniques with your digital footage. In a recent article about home video productions, I alluded to techniques that can make your videos more appealing. Two such techniques are what are called J-cut and L-cut editing.


You have no doubt seen J-cut edits used in films many times without knowing what it’s called . In this cut, you hear the audio come from one video clip, but you see footage from another clip or visual element such a title board. Here’s a quick example on my Jaycut share page of a J-cut edit.

The video opens with a title card and the sound of a mariachi song that is a part of—let’s call it—the A-clip. After a few seconds the title card ends, and the visual part of the A-clip begins with the mariachi dancers; the music from the A-clip continues.

The B-roll could have also been another video shot of say people watching the performance but with the sound of that clip edited out. So if say you’re shooting a music performance with a single video camera, you might grab a shot of the audience or the outside of the venue before the performance begins, and use it for your B-roll.

While the Jaycut editor only has two video tracks and one audio, you cannot split music from a video clip as you can in say iMovie. But here’s a workaround.

The J-cut

Step 1
After importing your clips into your Jaycut editor, drag the A-clip into Video A track. The A-clip is your main clip, with which you want to retain the sound.

professional video editing

Step 2<h2>The L-Cut</h2>
Now split the clip to the point where you want to show footage from your B-roll or title card.

professional video
Step 3
Drag the portion of the clip you want to hide into the Video B track. This is the part of the clip you will cover up with the B-roll clip.

professional video
Step 4
Now drag and replace the empty space in Video A track with your B-roll clip. If you’re using actual footage from another clip, you will probably need to splice it so that it fits where you want it in the Video A track.

professional video
In my example, I’m using a title card that has no sound, but if your B-roll clip has sound, click on the audio editor and mute the sound in that B-roll clip, so that only the sound from the A-clip is heard.

professional video services
Finally, click the Preview movie button on the right side of the editor to see if movie plays the way you want.

The L-Cut

The L-cut edit works almost in the same way, but in this case you insert B-roll into the middle of the A-clip, instead of the beginning.

professional video editing
To accomplish this edit in Jaycut, drag a copy of the A-clip into both the Video A and Video B tracks. Mute the sound of the clip in the Video A track. Clip out the part of the A-clip that you want to be replaced by your B-roll. And lastly, mute the sound in the B-roll, because you’re using the sound from the A-clip. Here’s an example on my Jaycut share page.

Let us know if this works for you. If you have an editing technique that you use in Jaycut or another video editor, please share it with us.


7 Sites To Find The Best Classic DOS Games


Click to learn How To Copy Games Disks


via MakeUseOf.com by Nancy Messieh on 9/20/10

dos gamesA while back Matt wrote an article on how to run DOS applications on your Windows machine. What better way is there to make use of that than to load up the old classic DOS games that we loved playing growing up?  They may seem outdated, but a classic is still a classic.

There are hundreds of old games with cheesy sound effects and questionable graphics that will make you wonder how you ever played them as a kid – but you’ll probably find yourself diving in headfirst into the ultimate memory lane in all of geekdom.

Mac users can also get in on the fun using the free app, Boxer. The free application uses a simple drag and drop approach to install and play games on your Mac.

Abandonware Games

Abandonware Games has a large selection of DOS games available for download. The categories included are action, racing, RPG and strategy games. With just over 700 games to choose from, you’re bound to find some of your favourites on this site. You can also search the site by game title or keyword. Each game is accompanied by a wealth of information from the year of release to the types of visuals, to how many times it has been downloaded.

dos games

DOS Games

After Abandonware Games, DOS Games has one of the biggest collections with over 500 games and counting in its database. The updates are spaced out, but every now and then, a bunch of new games are added. Browse the games by genre, or simply browse the entire list and see what catches your eye.

free dos games

Free Game Downloads

The design and graphics on the site, Free Game Downloads are about as exciting as the graphics of a DOS game. But their massive collection of games, and easy to navigate categories, make up for a pretty dull design. They also have a list of Atari games available for download.

free dos games

Free Classic DOS Games

Free Classic DOS Games has a list of about 200 games. Each game is accompanied by a review, description and screenshots, and most importantly, a download link. Search the site for your favourites or go through the entries one by one.

free dos games

RGB Classic Games

RGB Classic Games is another great repository with a huge combination of classics, previously unreleased games, and even a few “modern” DOS games. Browse the games by category, search the database, or chat with other DOS gamers in the forums.

download dos games

Free Game Empire

Free Game Empire offers a method of playing DOS games in your browser – but you do still need to download a couple of things. The site provides an easy-to-use emulator and, while you download the game to your computer, the game play takes place in your browser. Only Firefox and Internet Explorer are supported by the site.

Of course you only have to download the game the first time, after which you can return to the site and play it any time. The emulator can be uninstalled from your control panel. Mac and Linux users are out of luck as the site only works with Windows.

download dos games

Play.VG

If you’d rather not download anything at all to your computer, you can play some classic DOS games online at Play.VG. Forget tennis on the Wii, when you can be playing a pixelated game of tennis using nothing more than your arrow keys and spacebar – we were so easy to please back then. Other classics include Pacman and Sonic the Hedgehog.

dos games

Also be sure to check out Simon’s article on 4 other great resources for free DOS games.

What are your favourite DOS games on these sites? Let us know in the comments.


Click to learn How To Copy Games Disks


How To Disable Google’s Personalization Of Search Results


via MakeUseOf.com by Ann Smarty on 9/18/10

google personal informationIt’s never been a secret that Google uses your personal information (web history and browser data) by default to personalize your search results. Basically what it means is that what you see for some Google searches is (slightly) different from what other people see for the same searches.

You may like the feature (but want to switch it off for some searches) or you may want to disable it completely – it’s up to you and your purposes.

This post will look at various ways to do that.

1. Disable Google Personalization: Official Guide (Browser Independent)

Google does have an official way to disable the feature (I am listing it first because it’s official, NOT because it’s the easiest way to do it).

To disable Google personalization, you will need to do the following:

  • Sign out of Google when searching (OR: Disable / Pause and remove your Google web history);
  • Once signed out, in the top right corner of the search results page, click Web History and there Disable customization (OR: Clear your browser’s cookies).

google personal information

2. Disable Google Personalization: One-Time (Browser Independent)

Again, you may like the feature and the fact that Google tries to show you what you really want (your favorite sites or sites you are more likely to like on top), but in some cases you will want to see “real” results (for example, to check how your own website is doing).

In this case, what you need to do is manually modify the search query URL path: just add this parameter:

pws=0

The ‘pws=0′ parameter removes the search personalization:

tracking personal google searches

If you don’t want to add the parameter manually, use this browser bookmarklet (courtesy of Google System Blog):

Turn off Google personalization

Just drag it to your Bookmarks toolbar and click after you search Google. The parameter will be added and the search results reloaded for you to see de-personalized results.

3. Disable Google Personalization: FireFox

If you don’t want to mess around with Google settings (if you don’t want to disable and remove your search history, for example) but at the same time you do not appreciate Google’s personalization of your search results, use this FireFox addon called Google Global.

Google Global will let you de-personalize all your Google searches but apart from that coolness it will also let you easily see search results for other countries (a great plugin to have!)

tracking personal google searches

4. Disable Google Personalization: Google Chrome

I am not aware of a similar extension that would disable Google search personalization in Google Chrome but I was able to set that manually. Use this post on removing personalized search in Chrome as a great step by step tutorial:

  1. Go to Options and click “Manage” next to your “Default search engine“;
  2. Click ‘Add’ to create a new search engine and fill in the details:
  • Name: The name for your new (default) search engine
  • Keyword: Allows you to access it direct from the address bar (ala Smart Keywords in FireFox);
  • URL: Add the URL of a search result page here, and use the placeholder %s to show where the query should be.

Important! Include the pws=0 parameter to create a de-personalized search query:

tracking personal google searches

Finally, set the new search engine as default:

google personal information

Do you ever turn off Google’s personalized results?  Do you know of another method that we haven’t covered here? Please share your opinions in the comments section below.